Monday, January 19, 2009

Family Traditions

I come by my love for handcrafts naturally. Many of my ancestors have stitched, knitted, crocheted, and lovingly turned cloth or yarn into beautiful finished goods.

My great grandmother, (on my mom’s side) was born Marguerite Della Dutault . She worked as a milliner, designing and stitching hats in the late 1800’s. This was a period in time when all women wore hats, and in the upper classes, hats could be changed two or three times daily, dependent upon the occasion and time of day,


My grandmother on my mother’s side was born Marie Le Doux. She was born in the United States, but moved to, and married in Canada. My memories of her include stitching together, knitting, embroidery and many hours of talking. In her later years, she worked often as a seamstress, and I can remember visiting her and watching the various others in her senior development come to her for hems and alterations. She continued this work well into her nineties. I used to sit and smile as I watched another satisfied customer leave, with a new hem in his or her pants, although not always straight. Even though her work at that age was not always perfect, the sight of the people she sewed for was about on the same par, so everyone was happy.

I remember going to Grandma’s once, when she was in her early nineties, and she taught me how to hand-quilt. We sat there for hours, each quilting on our own project, and Grandma relayed her entire life story as we sat and stitched for three days. How I wish I had the presence of mind to have had a tape recorder. Her life was so fascinating. Grandma died at the fine age of 99, and I plan to follow her lead, stitching, quilting, knitting, and keeping busy until my fingers can work no further.


My grandma on my father’s side was born Martha Eggert. She also stitched and sewed most of her life. With seven children to raise, she was kept busy and her sewing machine was constantly humming. On this side of the family, there are 25 grandchildren, and I am fortunate to have been the one who recieved Grandma’s treadle sewing machine. I also was given her box of sewing haberdashery. How fun it has been to look through the treasures, and soon, I will get a shadow box completed, with little parts of both grandmothers in it.

Thursday, January 15, 2009

What I'm Working On..


There are various things that are in the works. I'll be announcing a few Cochenille things soon, but I thought I would share with you what I have been doing as a wrap-up of my sabbatical.

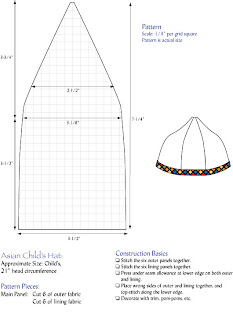
I have been working on the creation of patterns of ethnic of garments or accessory items from around the world. These will be presented in a Student Handbook which will be used in my Ethnic Costume class this coming semester.

Here you will see the pattern for a Child's Hat from the Mien Yao tribe in Asia. I purchased the original hat in Thailand. It has now been measured, sketched and a pattern pulled.

There will be 25 patterns in total by the time I am done. It's a lot of work, but I am enjoying it.


New Sewing Machine!!!


My new sewing machine has arrived! It is a Brother QC1000. As excited as I am, I have had to leave it in the box, as construction is happening in the room where it will live.

Here is a link to my new baby...
http://www.brother-usa.com/HomeSewing/ModelDetail.aspx?ProductID=QC1000

There will be more on this (and the new Studio) soon.

No-Sew Polar Fleece Throw


This Christmas, I decided to make each of my sons a polar fleece throw. They have always liked polar fleece, and I think it reminds them of their baby blankets.

A few years ago, I had watched one of my students at Mesa College building a no-sew throw so I called her to get the basics. She gave me info and directed me to do a google search of the web (using the keywords "no sew fleece blanket). Sure enough, I found lots of information.

This project is very simple, requires no sewing skills, and can be completed in just a few hours.


Materials:
  • Polar Fleece (two colors). Each piece should be at least 60 inches long.
  • Scissors or Rotary Cutter and Mat
  • A almost-gone bar of soap, or other marking tool
  • Quilting Ruler or other type of ruler


Steps
  1. Cut two identical pieces of polar fleece, measuring the width of the fabric by your desired length. Mine measured approximately 54 inches wide by 72 inches long. You may want to consider the desired length of your fringe prior to cutting these pieces, as proportions should be considered.
  2. Lay the fabrics, wrong sides together. Pin in a few places to hold the layers in place.
  3. If you have not already, determine the length and width of your fringe, and with this knowledge, cut a square of this determined dimension out of each corner of the throw. I used a five-inch deep fringe, cut every inch.
  4. Using soap (or other marking device), draw a guideline in from each side of the throw, measuring the depth of the fringe.


The following few steps are most easily done, one side at a time.
  1. Using a ruler as a guide, cut your one-inch fringe (from the edge to your marking line) up the side of the throw. You can either use scissors or a rotary blade as your cutting device. I used a quilting mat because it served two purposes; one to measure the width of each fringe, and second, to protect my table.
  2. Knot the two layers of a fringe strip together. Experiment with knotting techniques on scrap pieces of polar fleece to decide how you want to knot the layers together. I used a form of square knot.
  3. As you complete one side, ensure that the two layers still lay flat. Re-pin and adjust as necessary and proceed to the next side.

That’s it!