Showing posts with label Cochenille Design Studio. Show all posts

Monday, April 20, 2020

ToDo/NewDo: Original Textile Prints and One-Yard Fabric Designs with Garment Designer by Carrie Schneider

African Culture Transformed: One-Yard Print Challenge 

Carrie Schneider

Recently, San Diego Mesa College Fashion Program was involved with a collaboration with the African Art collection at the college and Visions Art Museum in Liberty Station, San Diego. 
Students designed fabrics using imagery from the online African Art archives. Approximately 20 fabrics were printed in one-yard pieces. These fabrics were placed in an exhibit at the museum called African Art Transformed.

In early March, the museum hosted a fashion show of African-inspired garments from Mesa Fashion students (also part of the collaborative effort). Carrie was challenged to create a garment from a one-yard piece of fabric. And this she did, not once, but twice, with two fabrics she had designed.

Here are Carrie's prints.


And now... look at what Carrie managed to do with a single yard of each! She used Garment Designer to create the pattern and her ingenuity to manage garments with a yard of fabric.


Straight skirt

Square neck, cap-sleeved top

A little about Carrie
Carrie Schneider is a biologist who never fails to be entertained by the unique and fascinating qualities of San Diego's natural habitats. She grew up in the verdant countryside of the Hoosier state then moved to the east coast, where she earned a Ph.D from the Massachusetts Institute of Technology and is now a consultant in biotechnology company. She led the Environmental Systems subcommittee for the City Wide Canyons Sewer Maintenance Task Force, whose proposed improvements to City procedures for accessing sewer infrastructure in open space parks were adopted by the City Council in 2002. She is a co-founder of San Diego Canyonlands, started the Friends of Switzer Canyon in North Park, and continues to lead volunteers to restore upland and stream-side habitat. She enjoys contributing to the Herbarium collections at the San Diego Natural History Museum as a trained parabotanist for the Plant Atlas project and was president of the San Diego chapter of the California Native Plant Society from 2002-2004.

Friday, April 10, 2020

A Log Cabin Quilt Challenge... as interpreted by a Wearable Artist, Judith Pipher

A Log Cabin Quilt Challenge with Sewing, Machine Knitting and Beading...
as interpreted by a Wearable Artist, Judith Pipher


Front of Garment
Judith shares her process of following a Quilt Challenge and incorporating multiple textile arts to create a one-of-a-kind garment.


My goal in life is to surround myself with like-minded people. In the world of fabric the nearest group to me is a quilt guild . I joined the guild and appreciate the art form that quilting gives. Now to explain, I am not a quilt maker. I am a quilter. I quilt garments. I do try to fit in sometimes and I do take part in guild challenges.


This Challenge was to do a log cabin design. Of course it was meant to be a wall hanging or quilt. My interpretation was a garment. The  inspiration came from The Asymmetrical Layered Jacket from Cochenille Design Studio's The Easy Seven Series book. 

All pieces were charted out using Garment Designer pattern making software (www.cochenille.com). 

Both sleeves, left front and half the back were knit using my knitting machine. All hems were knit first using stocking stitch. The fabric was an assortment of Chinese inspired quilt fabrics. I took the right front pattern piece and the upper back piece from my pattern and then cut  the shape out of light weight cotton. Then the Log Cabin pattern began to take shape. On the centre back, the quilt pattern was overlapped to lay on the knitting. This was done to extend the log cabin square and to draw the eye away from the line of  sewing. The V-shape was then hand sewn on top of the knitting. The seam that joins the knitting and quilting was above the armhole to making it easier to manage. 

Front and Back of the garment

The inside of back quilting was finished by using a bias-trimmed lining to cover the stitching of the fabric. On the right front fabric side I used the same pattern shape to create the lining and slip stitched it in place. On the left side, a knit  facing was made to allow  the v-neck to lay flat and not curl. 

Inside of the garment

I continued to think about the art form of the Victorian Era of Crazy Quilting. On a black ultra suede strip on the fabric side  a dragon was created with embroidery and beading. A zipper was used for the closure and the stitches were concealed with an embroidery stitch. On the knit side, appliquéd strips of cloth were used at the shoulder matching up with the back fabric, creating an over the shoulder flow. Brass Chinese coins  were added to create whimsical detail.

To  add other focal points Bead work was done in the centre of a large flower, plus a small floral brass charm was added on the back.

Details

Once finished I realized that the back length was not the correct proportion for me. I shortened it by undoing the side seams, picking up stitches, then rehung the garment on my knitting machine finishing it with a hem and mitre corners at the side slits. 

The results of this design are, it is not a traditional quilt but it is wearable and  keeps me warm and best of all it forms a part of my one of a kind Signature garments !
"Each of us has a unique part to play in the healing of the world".  Marianne Williamson.

A Little about Judith
Judith is a retired historical interpreter. She loves history and now volunteers to do textile management at different museums.  She does condition reports, exhibits and cares for them. Her first and best love? Fibre of all kinds.

Judith travel to learn, to meet like-minded people and to be inspired. She went back to college at the age of 64  to learn pattern making. She continued on to study tailoring with Le Grand Chic school In Italy through Georgian College Barrie. and she graduated at 70!  We were honored to have Judith study with Cochenille in both Italy and San Diego. she has also studied with Jon Moore in London,  Susan Khalje in NYC, and Kathryn Brenne in North Bay (ON, Canada)

Thursday, March 26, 2020

ToDo/NewDo: Machine Knitting the Landscape Around You by Judith Pipher

A Machine-Knit Masterpiece: The Tom Thompson Pines!

Judith Pipher, Wasaga Beach, Ontario, Canada

This sweater is an original design by Judith. It is inspired by the Canadian artist Tom Thompson.

Judith describes her design..

My loves are Georgian Bay which is on the Great Lakes. 

The yarn colours are blends of Koigu yarn from Chatsworth Ontario. The plan was drawn on to my basic sweater pattern that was put on to paper, then coloured.  It was then knit on my 940 brother.  The back is stripes of the colour on the right side. The pictorial was done in intarsia,  the trees are hand embroidered. it was to have a front zip. That proved to be too heavy so I sewed it closed then made an I cord  to match  to hide the join.

side view
back view


A Little about Judith
Judith is a retired historical interpreter. She loves history and now volunteers to do textile management at different museums.  She does condition reports, exhibits and cares for them. Her first and best love? Fibre of all kinds.

Judith travel to learn, to meet like-minded people and to be inspired. She went back to college at the age of 64  to learn pattern making. She continued on to study tailoring with Le Grand Chic school In Italy through Georgian College Barrie. and she graduated at 70!  We were honored to have Judith study with Cochenille in both Italy and San Diego. she has also studied with Jon Moore in London,  Susan Khalje in NYC, and Kathryn Brenne in North Bay (ON, Canada)


Wednesday, March 25, 2020

ToDo/NewDo: Gillian Lamb (UK) Finished Bead Projects

Completed Bead Projects

Gillian Lamb, Surrey, England

Recently Gillian caught up with her UFO’s from her bead teaching days. 
She says:

Very often there was not time to complete the samples I made for use in class.
The grey necklace uses cubic right angle weave and seed beads of different sizes, decorated with faux pearls.

All the small pink brooch needed to finish it was a pin on the back.
I feel so good to have completed both projects after so many years.

Grey necklace (above) and pink brooch (below)

The lovely beaded bumble bee below was a test of my dexterity after two hand operations last year. It is mainly made from delica cylinder beads, size 15/0 seed beads and peyote stitch.

A major feat after two hand operations!

I am gradually working through all my UFO’s and of course adding into the mix a new project or two. Rule 1 ..... finish the project. 


A little bit on Gillian
Gillian lives in Surrey, England and is officially retired, but she says there is always something to work on, be it a craft, the garden, or in the kitchen cooking. She started hand knitting at her grandmothers knee, knitted her wedding dress and got drawn into machine knitting and ultimately published a few patterns in magazines.

Gillian was lured into beadwork thanks to Stitch Painter software by Cochenille Design Studio. She taught in the UK and Japan, her beadwork book was translated into Japanese.
She says that now in her life she is spoilt for choice: so many crafts that she enjoys. She is trying to get better with her sewing and not be afraid of her machines.

Friday, March 20, 2020

NewDo Project: Crochet Top by Kathleen Heafey

Crochet Sleeveless Top

by Kathleen Heafey, Berkeley, California

I recently met Kathleen at Stitches West in Santa Clara. She purchased Garment Designer and immediately went home and had a garment going within a day. I love that! 

Kathleen shares this crochet top with us as her "NewDo".


Garment Details:

I did the garment as a semi-fitted top, sleeveless, round neck with some adjustments to the sloper in the shoulder area to accommodate my narrow shoulders. I also slightly adjusted the shape of the neck. This was my first attempt with Garment Designer and I love using the program! So much flexibility and the shaping instructions for crocheting were very accurate based on my stitch count.

Yarn:
Katia 50% silk 50% cotton blend. ( I believe it’s discontinued)
I crocheted the seed stitch for the body and added the bobbles. I did the neck, arm and bottom edging separately in a V stitch. 


About Me:
I have a small business in Berkeley, California called Woven Grey. I design and make a line of cotton storage baskets and am carried in shops throughout the country. I started crocheting a few years ago and have been trying to design original patterns with the intent to eventually publish my designs.

Kathleen Heafey
hello@wovengrey.com
www.wovengrey.com
510-735-1413 (cell)

ToDo/NewDo Project: Barbara Kerr's Necktie Change Purse

The Change Purse in process

Creative Necktie Change Purse

by Barbara Kerr, Seattle Washington

Here is our first Todo/NewDo share. Barbara says:

In these uncertain times the very best thing to do is to focus our mind on something pleasurable. This little change purse is made from a vintage man’s silk tie.  A friend at a recent embroidery guild meeting taught us how to do it.


 General Info
 
  • The 9 inches for the bag are cut from the wide end, and 9 inches from another tie is for the flower 
  • The flower's 9 inches are cut from the other end of the tie- 
  • The interfacing from the bag is left in and is removed for the flower 
  • The button was the last one on a card and was so perfect
  • It is hand stitched and takes about 2 hours to make


The finished piece in use

A little bit about Barbara

Barbara is a retired Social Work Supervisor from Columbia Presbyterian Hospital in NYCShe moved to Seattle in 2012 where she lives with her daughter in a nice little house in West Seattle. 
Barbara shares her past...
When I was about 7 my friend and I learned to hand sew from her 2 young aunts. My aunt taught me to stitch on a machine and I sewed my wedding dress. I made all my clothes , my children’s clothes  and my husband’s sport shirts. 

I taught myself to knit when I was 17 and have knit almost every day since. I started to teach knitting, crochet, embroidery and English Paper Piecing in 2001 and taught at the Stitches Knitting Convention for the following 11 years. I still teach at Pacific Fabrics in Seattle (closing today for the next 2 weeks).

I belong to the Evergreen chapter of the Embroiders Guild of America, the Pacific Northwest Needle Arts Guild, and a knit /crochet  group that meets in a Community Center. I have 3 gals who come to my house every Monday for Embroidery and socialization.

Thank you Barbara for sharing your NewDo project. This is also an upcycle and sustainable item. Congrats to you and your creativity!


Creativity vs. Corona Virus: Get Involved


As many of you know, I own and run Cochenille Design Studio, a company that develops software and design aids for the textile design world. I am a practitioner of many creative arts ranging from sewing, knitting, pattern making, cooking, mosaic, beading, photography, art, and many other things. Having grown up on a farm in rural Ontario, Canada with a mother and grandmothers who were creators gave a sound education in the home and creative arts. Having trained for and taught as a Professor of Fashion for most of my professional career also further nurtured things along.

Today in this world, we definitely live in uncertain times. For my business, we have had two trade shows canceled, which is no surprise given travel and other restrictions. We have also canceled our Italy retreats this June, and are still pending the decision for the France retreat (although I think that has now been taken out of our hands).

Here, at Cochenille, we’ve decided to try and make the best of our new daily life by using our at-home time to be creative. It is after all, National Crafts month.

So, we are asking our Cochenille audience and readers of this blog to join in and share with us on this creative challenge.

We are calling this challenge –ToDo/NewDo
  • The To Do portion is to finish a project that is sitting in your ‘need to do’ pile. This could be a partially-complete project, alterations, or similar
  • The New Do portion is to create a new project using any craft technique, from scratch.
Here is a link to a page on our website, where you can download this ToDo/NewDo list to use.

Join us in this creative solidarity. We hope to make it global. Send me (Susan) a photo of your project along with your info, and a brief description of the project.

I will share and post these for others to see. These do not need to be Garment Designer or Stitch Painter projects. Just jump in and finish up those UFO’s (unfinished objects), or start something new from scratch! In fact, your projects could be things like organizing your sewing room, yarn stash, or other.  Your project doesn't have to be fiber arts; it could be woodworking, home arts, a new recipe, etc. The idea is to use our time creatively and to share with each other.

We will be using this blog as the hosting site. This morning I posted a To Do.... now complete. Check it out.
So, I say Tag!! your turn

I will will post the images sent by those of you willing to be involved on this same blog. Please send them to susan@cochenille.com

Feel free to join the mail list of the blog so you can be notified when an entry is posted. Also feel free to invite friends to join in the ToDo/NewDo Challenge.

Be safe, and be well.

Our very best to all our audience.
Susan Lazear
Cochenille Design Studio

Thursday, March 19, 2020

Garment Designer Pattern/Top: finally finished...

Final Garment
Taking Care of Business with Creative Projects
The beginning of the ToDo/NewDo Challenge

Have you ever had a project sit, just waiting for a final step? Maybe it was the hem, or neck treatment.

Here is a top that has been hanging on the door of my studio for an embarrassing long time. I don't know what the hold-up was. Most likely it was life. All that was left was to put in the sleeves, add hems, and neck finish.

So, in support of getting things off of my 'To Do' list, I am completing some of the UFO's (unfinished objects) in my creative life.


This was the pattern for the top, created with Garment Designer software. This style has been around for a long time, but I still like it. 


Garment Designer pattern

For the fabric, I chose a funky knit, and I actually chose to use the wrong side of the fabric because I liked the fringed cut edges throughout. The knit is quite fluid.


My Sewing Order Rule of Thumb
As you might guess, when you create your own patterns, you have to figure out the sewing instructions/order. I have a simple rule of thumb which I often used as a mantra to my students.

Mantra
Sew as small as you can, as flat as you can, for as long as you can.

This means, sew as many things together as possible, in their small state (e.g. pockets onto skirt) before you start joining pieces. It also means keeping things flat (non 3-D) for as long as you can.

In this garment, I adopted the following order.

  • Sew shoulder seams
  • Attach neck treatment
  • Sew side seams
  • Insert sleeves (note: I could have done this on the flat also)
  • Hems

I love my serger, so this was used in the process. 

The hem is simply a turned 1" hem.

Closeup of fabric and neck treatment

For the neckline, I used my old stand-by, an old Stretch-n-Sew technique of cutting a strip 4x the desired width, stitching it on, and wrapping it up and over, and behind the seam allowance, and top stitching or stitching in the ditch to secure it.


Finally, you can see how that extended side seam drapes and creates an asymmetrical look to the hem.


And so... I can now say that this project is....

Friday, March 13, 2020

Garment Designer Pattern Software Top: African Influence

Design with imagery in Garment Designer Pattern

African Culture Transformed into Fashion


Recently, I oversaw a project at Mesa College in San Diego, which involved a partnership between our Fashion students, the Mesa African Art collection, and Visions Art Museum in San Diego Liberty Station. There were several aspects to the project, but the final activity was a fashion show featuring African-influenced clothing. 

Many of the garments came from my Textile Design students in my Fall semester class. I decided that I too needed to get involved, and so embarked on two different
design projects. In this blog, I’ll share the first with you.


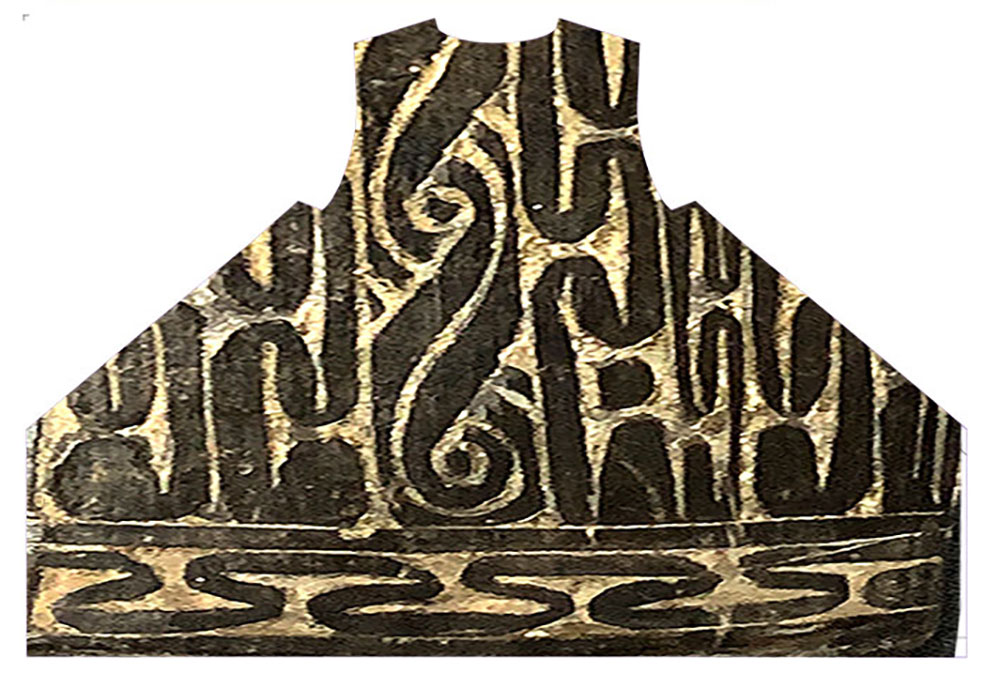
My source of inspiration was a piece of carved wood. Sad to say, I don’t know future details, only that I took the photo while we were visiting the artifact collection.

Since the original wood piece was rounded, I had to use Photoshop to straighten it out a bit.


Photo of Inspiration: a piece of carved wood

I wanted the garment to be relatively simple, free of internal structural lines, so that the wood imagery would be seen as it was designed.

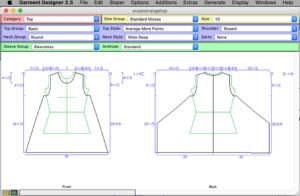
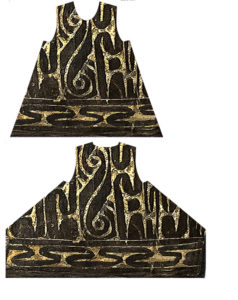
Below is the pattern I settled on. This was modeled after a top I own that I purchased in Japan.


Pattern created in Garment Designer pattern software


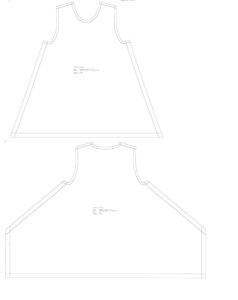
=In Garment Designer, I set the page size to be the size of the pattern, and then saved the pattern as a PDF.
Then.. on to Photoshop.

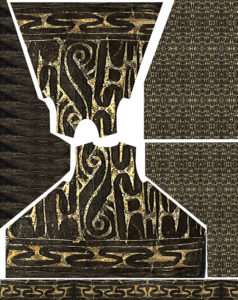
There I opened the large pattern pieces (each on a separate page), and I brought them together into one document. The width of this document was set up to the width of the fabric I wanted to print on (which was a polyester chiffon, 58” wide).


Pattern pieces laid into Photoshop
Layout in Photoshop (sorry this is a LARGE file and so doesn't downscale well)

Working between the imagery document and the Garment Designer pattern document, I used Selection tools, and copy/paste to bring the images in. I orchestrated a border
effect on the bottom and stretched the imagery to fill the space above. You can see the results below.


Garment Designer pattern in Photoshop with the imagery engineered into place

Once I had the layout ready, I threw in some variations of the pattern off to the side of each pattern piece, so I would have fabric to trim the neckline and armholes during the sewing process.


Extra imagery is added to the file to provide trim fabric

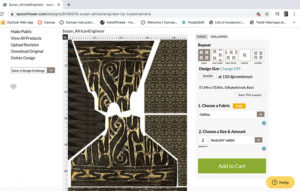
The next step was to upload to Spoonflower in North Carolina.


The order process on Spoonflower a company that digitally prints fabric
And then to wait until the fabric arrived, which of course was only a few days before the fashion show… so time to sew!!

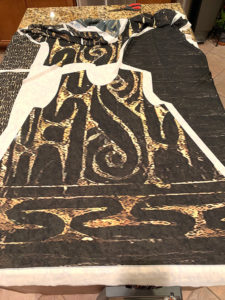
One of the beautiful things about engineered design, is that you don’t ever print a paper pattern. Instead, your fabric arrives with the garment piece all laid out and ready to cut. Here is my fabric just before cutting.


Fabric ready to be cut. Note how similar this is to a cookie cutter approach!

I used some of the trim areas to make the binding for the neckline and armholes. These were cut on the bias and applied to finish the edges. The most challenging part of the construction was sewing chiffon on a bias grain. I simply serged the edge, pressed it under and top stitched it in place, attempting to have minimal handling.

The garment was complete, and ready for the show.


See how the back cut is different from the front

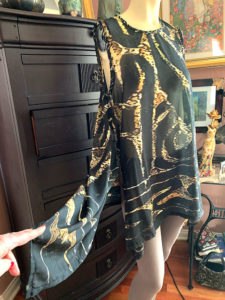
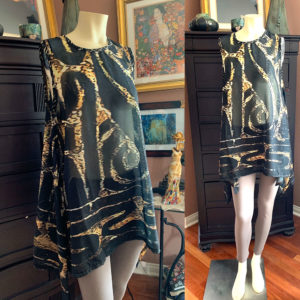
The final garment, yea! and in time for the show
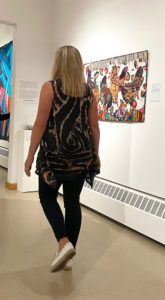
I only have one shot from the show, a rear-view, but as you can see, it was modeled.


Alys modeling the top at the Fashion Show at Visions Art Museum in San Diego, CA

So, another ‘done’ project. I love to have a motivator (such as a fashion show) which gives me the reason to move ‘To Do’ items up the list of priorities.


And I course, I love Garment Designer. It is such a creative tool; I can do most anything with it and in very short order, and of course, because it knows my body measurements, I never have to alter. Can life get any better?


Wednesday, February 26, 2020

Fashion and Food Tours in Northern Italy: Italy Anyone?


Italy Anyone?

For the past 15 years, I’ve travelled to Verona, Italy each summer. I first went there in 2006, primarily because I had found out they had an open- air opera that took place in a Roman arena.
So, off I went on my adventure, and I enjoyed not only the opera, but also the city itself.
Verona is a small city, situated in the north. It has a very strategic position in history, as it is between Milan (west) and Venice (east). Most trains from the north come down to Italy through Verona as well.
Enjoying gelato in Verona

 
After my first year, I decided to study Italian, and then, I consciously decided to make friends (which is a bit of a push, even for me, as I have a shy side). All this has blossomed into many wonderful adventures and friendships. And, as always, I was always on the lookout for anything to do with fashion and cuisine.  I feel like serendipity follows me around. Who was to know that..
·      My landlord who was a banker, had a client who owns a knitting manufacturing mill
·      I would strike up a conversation with a small group at the next table in a restaurant, only to find out that he was a food tour guide
·      One of my girlfriends had a friend who was restructuring her grandmother’s home in central Verona into tourist apartments
·      The wife of a restaurant owner was a felter who gives workshops
·      My growing network of friends would watch out for textile/fashion/food things for me
·      Milan and Venice each are just over an hour train ride from Verona and trains run often
·      The ‘nonna’ (grandmother) of the knitting manufacturer’s family enjoys teaching pasta making and cooking to me and my friends
·      The gelateria owner would be willing to let us taste gelato in the realm of wine tasting
·      There is an amazing fashion museum in the country in the middle of nowhere; it was once the summer estate of a lord.
·      Verona is very fashion forward; store windows change constantly and are full of innovative design
·      And so on..

A few years in, I felt I had enough connections to lead small group tours of my second home, Verona. I first organized Fashion retreats and involve artisans, travel to Venice/Milan, and related. People are always gracious to us, and we have some of the most amazing experiences.

Below are some images
 
The Roman wall that touches our apartment building

Store window in Verona

Day trip to Venice

Visits to Jenny Klaer, a yarn store in Verona

A typical vineyard in Valpolicello region

Watching a purse making demo at Dolce and Gabbana in Milan

The sales woman modeling for us at Issey Miyake in Milan

More Issey Miyake fashion, Milan

Nonna... making pasta


This year, I’m hosting two retreats in the month of June. One for food (it’s great for couples), followed by one for fashion.  Information can be found at the links below.