Showing posts with label Pattern making software. Show all posts

Thursday, March 19, 2020

Garment Designer Pattern/Top: finally finished...

Final Garment
Taking Care of Business with Creative Projects
The beginning of the ToDo/NewDo Challenge

Have you ever had a project sit, just waiting for a final step? Maybe it was the hem, or neck treatment.

Here is a top that has been hanging on the door of my studio for an embarrassing long time. I don't know what the hold-up was. Most likely it was life. All that was left was to put in the sleeves, add hems, and neck finish.

So, in support of getting things off of my 'To Do' list, I am completing some of the UFO's (unfinished objects) in my creative life.


This was the pattern for the top, created with Garment Designer software. This style has been around for a long time, but I still like it. 


Garment Designer pattern

For the fabric, I chose a funky knit, and I actually chose to use the wrong side of the fabric because I liked the fringed cut edges throughout. The knit is quite fluid.


My Sewing Order Rule of Thumb
As you might guess, when you create your own patterns, you have to figure out the sewing instructions/order. I have a simple rule of thumb which I often used as a mantra to my students.

Mantra
Sew as small as you can, as flat as you can, for as long as you can.

This means, sew as many things together as possible, in their small state (e.g. pockets onto skirt) before you start joining pieces. It also means keeping things flat (non 3-D) for as long as you can.

In this garment, I adopted the following order.

  • Sew shoulder seams
  • Attach neck treatment
  • Sew side seams
  • Insert sleeves (note: I could have done this on the flat also)
  • Hems

I love my serger, so this was used in the process. 

The hem is simply a turned 1" hem.

Closeup of fabric and neck treatment

For the neckline, I used my old stand-by, an old Stretch-n-Sew technique of cutting a strip 4x the desired width, stitching it on, and wrapping it up and over, and behind the seam allowance, and top stitching or stitching in the ditch to secure it.


Finally, you can see how that extended side seam drapes and creates an asymmetrical look to the hem.


And so... I can now say that this project is....

Friday, March 13, 2020

Garment Designer Pattern Software Top: African Influence

Design with imagery in Garment Designer Pattern

African Culture Transformed into Fashion


Recently, I oversaw a project at Mesa College in San Diego, which involved a partnership between our Fashion students, the Mesa African Art collection, and Visions Art Museum in San Diego Liberty Station. There were several aspects to the project, but the final activity was a fashion show featuring African-influenced clothing. 

Many of the garments came from my Textile Design students in my Fall semester class. I decided that I too needed to get involved, and so embarked on two different
design projects. In this blog, I’ll share the first with you.


My source of inspiration was a piece of carved wood. Sad to say, I don’t know future details, only that I took the photo while we were visiting the artifact collection.

Since the original wood piece was rounded, I had to use Photoshop to straighten it out a bit.


Photo of Inspiration: a piece of carved wood

I wanted the garment to be relatively simple, free of internal structural lines, so that the wood imagery would be seen as it was designed.

Below is the pattern I settled on. This was modeled after a top I own that I purchased in Japan.


Pattern created in Garment Designer pattern software


=In Garment Designer, I set the page size to be the size of the pattern, and then saved the pattern as a PDF.
Then.. on to Photoshop.

There I opened the large pattern pieces (each on a separate page), and I brought them together into one document. The width of this document was set up to the width of the fabric I wanted to print on (which was a polyester chiffon, 58” wide).


Pattern pieces laid into Photoshop
Layout in Photoshop (sorry this is a LARGE file and so doesn't downscale well)

Working between the imagery document and the Garment Designer pattern document, I used Selection tools, and copy/paste to bring the images in. I orchestrated a border
effect on the bottom and stretched the imagery to fill the space above. You can see the results below.


Garment Designer pattern in Photoshop with the imagery engineered into place

Once I had the layout ready, I threw in some variations of the pattern off to the side of each pattern piece, so I would have fabric to trim the neckline and armholes during the sewing process.


Extra imagery is added to the file to provide trim fabric

The next step was to upload to Spoonflower in North Carolina.


The order process on Spoonflower a company that digitally prints fabric
And then to wait until the fabric arrived, which of course was only a few days before the fashion show… so time to sew!!

One of the beautiful things about engineered design, is that you don’t ever print a paper pattern. Instead, your fabric arrives with the garment piece all laid out and ready to cut. Here is my fabric just before cutting.


Fabric ready to be cut. Note how similar this is to a cookie cutter approach!

I used some of the trim areas to make the binding for the neckline and armholes. These were cut on the bias and applied to finish the edges. The most challenging part of the construction was sewing chiffon on a bias grain. I simply serged the edge, pressed it under and top stitched it in place, attempting to have minimal handling.

The garment was complete, and ready for the show.


See how the back cut is different from the front

The final garment, yea! and in time for the show
I only have one shot from the show, a rear-view, but as you can see, it was modeled.


Alys modeling the top at the Fashion Show at Visions Art Museum in San Diego, CA

So, another ‘done’ project. I love to have a motivator (such as a fashion show) which gives me the reason to move ‘To Do’ items up the list of priorities.


And I course, I love Garment Designer. It is such a creative tool; I can do most anything with it and in very short order, and of course, because it knows my body measurements, I never have to alter. Can life get any better?


Monday, February 17, 2020

Accessory Design with Garment Designer Pattern making Software


For the past five years, I’ve been designing leather handbags with Garment Designer, my pattern design software. (https://www.cochenille.com/garment-designer/garment-designer-overview/).


Most people think of it as only a ‘garment program’, but it can do so much more.

Each June, as I host a fashion retreat in Verona, Italy, I take my group of participants to meet Paolo and Dario, two brothers who are leather makers and the owners of Il Girasole in Verona. Over the years, I have become friends with these gentlemen, and they now humor me by allowing me to bring in a design concept and pattern from Garment Designer, and they translate it into a finished leather bag. I have several of these now, and so will share the design process.

Scalloped Purse, 2018

Inspiration Purse: note the scallop and the handles
The process generally begins with a concept or a purse or a photo inspiration. Here is the bag that started the thought process of my 2018 purse. It is from a store window in Como, Italy.
  
… I knew that the scallop would be the key feature of the bag, and that the handles would interact with the 'dagged' shape.


I start myself with a measuring tape, pencil and a quick rough sketch to determine the approximate size and dimensions
My rough drawing
 Then, I go visit Paolo and Dario to see what they think and to explore what leathers we might work with. Here is what we settled on.


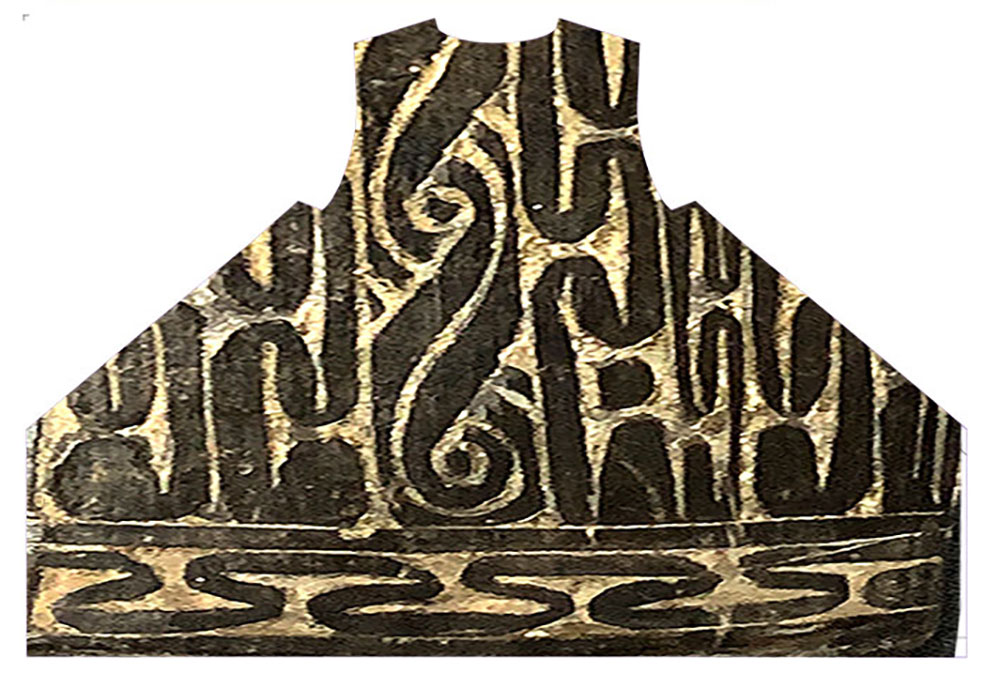
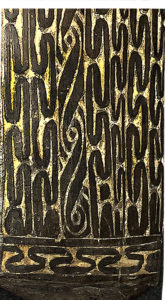
I loved these two leathers... green embossed for outside, pink glitter for the inside

Paolo now gets involved as we look at my sketch, some other images from online, the leathers involved, and the dimension. (we do this in Italian …. I’m getting better at the language, and I’m certainly motivated to speak by the project).


Paolo working out ideas

Translating inches to metric

Then, off I go back to my apartment, and I create a pattern in Garment Designer to test out my measurements and concepts. Sometimes I find fabric and hand sew a sample, and sometimes I simply print out the pattern a tape it together. I’ve even made a sample out of the paper napkins from a restaurant.
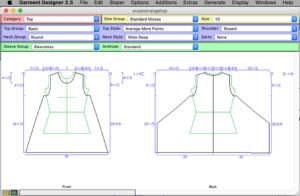
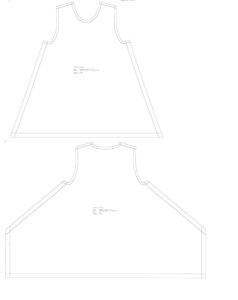
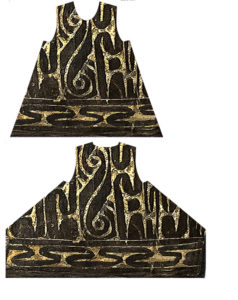
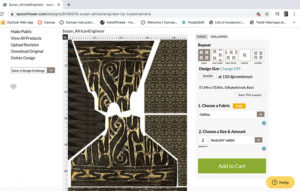
Here are my Garment Designer patterns. I used a scalloped top to get the scallops. I will only use part of this pattern. Then, I built the smaller front piece and the piece that will become the bottom and side of the purse. Note that it gets wider to allow for a ‘pleat’ on the upper side panel)

Pattern for the scallop flap, the side/bottom and the under-front piece

Then, I print in actual size and tape the pieces together and take the sample to Girasole where we do an evaluation.

Generally, at this point Paola has a laugh, or he scratches his head and thinks. He aks questions, offers suggestions, points out my flaw in thinking, etc.

Paolo laughs.. pretty typical

Now is generally the time to discuss the finishing’s and hardware. So, often zippers and snaps/magnets come out.
Choosing the zipper, and findings
Once again, I go away and let the magic happen. At some point in this process, I generally bring my fashion group in to see how Paolo and Dario are progressing and to share their workshop with my group.
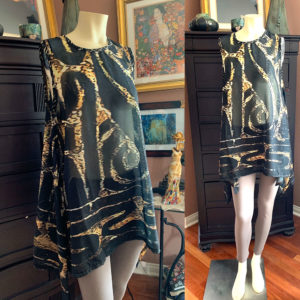
Here is my finished bag.. with the pattern beside it.

Finished bag on the left and my pattern on the right

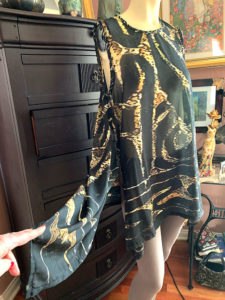
Here is a detail of the inside and the pleat at the upper side of the side purse.

Inside of the purse.. oops.. my lipstick is peeking out!

Note the 'tuck' at the top side. It's a great detail, part of Paolo's signature in his work.
There is almost always a surprise aspect to the purse when I see the final project.

And here is my bag, back home in San Diego, being worn and loved.
Off to Balboa Park!

Closer view of the purse
I really enjoy doing these projects with Girasole, and I think Paolo and Dario feel the same. (or at least I hope they do).

Below meet Dario.. the other part of the business. He is standing with Barbara, who purchased this origami purse from them.; This was a project from a previous year. I’ll blog about that one in the future.
Brother Dario with Barbara and her new 'origami' bag.

Garment Designer does have an optional Plug-in for Tote Bags, Couture Totes. There are twelve bags in the set, each designed after a garment style (e.g. Peasant top, Ruffle Purse, etc.). They offer Small, Medium and Large sizes, and can be a great starting point for your own original style.’ Garment Designer owners can simply add this on, or it is available as a stand-alone software program.
Go here for more information, and scroll down a bit.

Thanks to Paolo and Dario for their ingenuity at translating my inspirations and patterns to actual Italian leather handbags!


Il Girasole - Artigianato del Cuoio
 Via Sant'Egidio, 15, 37121 Verona VR, Italy
Phone+39 045 832 8693