One of the great
pleasures of working with Garment Designer is discovering new ways to push the
boundaries in design. For me, combining a second love (Photography) with pattern
design, allows even more creativity to flow, and well, it doesn’t get much
better than that.
The best way to mix Garment Designer with Photography is to utilize a design
technique which involves ‘engineered design'. You choose a silhouette that
suits the imagery, create a full-scale pattern in Garment Designer, then save
it as a PDF. Then, you take the pattern into Photoshop. There, you lay the
photographic imagery into the garment, controlling its placement.
The last step of this process is to print the full-scale photography pattern.
I originally started with sublimation printing, utilizing Kid Neptune, a local company here
in San Diego. Now I am printing my patterns using Spoonflower
(www.spoonflower.com).
Let’s walk through the steps.
The Concept:
Desert Escape
– which was the theme for our Fashion Show at San Diego Mesa College.
Or at least narrow it down.Since the theme of this project was Seize the Sunset, I needed to find imagery that spoke to that. In looking through my photographs, I decided to use one of my shots of the sunset here on the beach in the San Diego area. Note the person on the bicycle!
 |
| Sunset on Cardiff Beach, San Diego area |
Develop the Pattern in Garment Designer
It helps if you know which photograph you are wanting to use, because sometimes the photo directs you to a silhouette.In choosing a garment silhouette, I knew I needed to keep it relatively simple so that the imagery would be the focus. It is important to pay attention to the amount of ‘real-estate; you have in relation to the imagery you want to lay into the pattern.I chose to create a simple A-line dress with an empire seam. In Garment Designer software (www.cochenille.com) I used the Top Plus Bottom option to develop the pattern. Then I saved my full scale pattern to a PDF file, using a document size of 38.5 x 58.5 (which was the maximum size of the sublimation press.
 |
| Empire style dress in Garment Designer |
Prep your Photography
For my main garment, I turned the sunset vertically. In addition, I build a stripe pattern by splicing a strip of the sunset; I wanted to use this for the empire bodice.
 |
| Sunset image turned vertically |
 |
| Stripe pattern built by splicing the sunset in Photoshop |
Combine the Photo with the Pattern
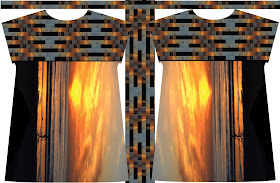
Next, I loaded my PDF pattern pieces into Photoshop and combined the pattern pieces into one large document (set to the size of the press). Using Selections and Cut and Paste, I then moved my photography into the garment. I could pan my imagery around inside the garment to determine where to place it.
 |
| Working in Photoshop |
 |
| Final layout |
The last step was to send the imagery to the Sublimation company. They printed it using special sublimation paper and ink, and then they pressed it onto my polyester fabric.
Sew..
What is really cool here is that you can see the entire pattern in the fabric and simply cut out the shape of it... completely engineered.
Repeat....
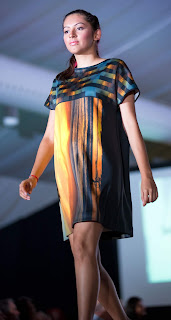
Since I was having so much fun, I did a second garment.
 |
| Raglan design in Garment Designer |
 |
| Layout in Photoshop |
 |
| On the runway with Garment Designer!! |
No comments:
Post a Comment