This is the blog of Susan Lazear, Creative Director and owner of Cochenille Design Studio, a company that produces software for the textile arts, and Professor of Fashion at Mesa College in San Diego, California. www.cochenille.com
Monday, October 27, 2008
Project (cont'd) Choosing Yarn.. and printing
Continuing the Process
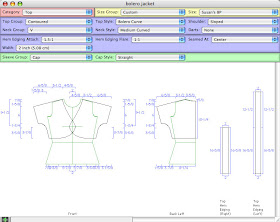
I have since built a sketch in Illustrator, so you can have an idea of the initial concept and the variations I played with. As you can see, I utilized the bolero style, and the extended cap sleeve. I then added the wide sleeve cuff. The two places where I spent time to experiment, were
* The style of collar,
* Whether to create the lower garment band as a knit, or as a self-fabric.
As you can see, I have three variations. I have firmly decided on the rectangular collar. I will probably leave my options open on whether to knit the ruffle band on the bottom of the garment, or to use a self-fabric. At the moment I am siding with self-fabric.
Finding the Yarn
As I am on the road,(traveling for sabbatical research) and don’t have access to my stash of yarn, I am forced to go out and find the yarn in a shop (oh dang…). I have found that sometimes it is hard to find a yarn store overseas. As luck would have it, when in Austria, Ursula and I happened upon a yarn store that was newly opened. The name of the shop was Andrea’s Wollstuberl (see prior blog), and Andrea is the owner. This shop is in Wattens, Austria.
I took my fabric with me to the store. We laid it down on a table, and then began to go around and find yarns that might work. One must decide what is the most important thing in the decision. I decided that it would be color in this case. I looked at a few variegated yarns that were subtle in their color blend, but they seemed to fight the business of the fabric. So, in the end, I settled on a solid mohair yarn. The fuzziness of it is fine for this purpose, as it works with the fur nature of the fabric. I will need to knit double-strand, so will have to do a little experimenting. I am fine with needles, as I brought along my set of Yarn Pick’s wooden needles (which I love dearly). First, they are beautiful to look at, and second, I have complete flexibility, as you simply change the needle tip to get to a different size of needles.
Finalizing and Printing the Pattern
Back to Garment Designer…
For now, I am only concerned with getting the pattern for cutting out the fabric. So, I return to the program, and confirm my design decisions.
Prior to printing anything, I always request the Information and Recommendations window, so that I can see if there is anything I have overlooked. Garment Designer automatically measures all your seams and looks at the angles where corners meet to ensure that you will have nice transitions when you join two pieces together. Use the Generate>Information and Recommendations command for this. When the window opens, I look to see if there is anything in red. If there is, I need to either fix something, or be aware. In the case of this jacket, all was well, so I have no corrections to make.
Now.. to printing.
Note… The following seems like a lot of steps, but they become automatic. I do them all with the keyboard, in about 3 seconds.
I always print a schematic of the pattern. First, I move into landscape mode (File>Page Setup). Then, I turn off the grid (Display>Show Grid), and leave all seam allowances off (Additions>Enabled Additions…) so that the dimensions are easy to read. I will use the schematic on the front of the pattern packet I will build. I can choose to leave the sloper on or off.
I also print out the Project Summary, as it reminds me of all the options I chose when building the garment.
Sometimes I turn on the option to see what points I moved, and print this as well. This will remind me how much I altered the original choice of options. Use the Display>Highlight Moved Points menu command to do this.
Once the schematic is created, I put the seam allowances and grid back on, turn off the dimensions (Display>Show Dimensions), and zoom to actual size (Display>Scale to Actual Size). I also turn on the Final Pattern mode, so that I can see the notches (Display>Final Pattern). Then, I request the print preview with pagination (Display>Show Pagination and Display>Print Preview).
Once I am looking at the Print Preview, I see how many pages of paper it will take to print the pattern. Then, I go to the File>Page Setup (or Print Setup on Windows) and change the orientation back to portrait. I can compare how many pages in both modes, then choose the one I want.
Now… I print. I won’t print the ruffle band at this time, as I am not positive I will use it (as I may knit that piece). As the pages print, they are hatch-marked and numbered, so they are easily put together.
Taping the pieces
I am rarely anal, but when it comes to my patterns, I like them to look nice, so I take the time to cut off the excess paper from the right side and lower edge of each pattern piece. Then, I have a well, on the left and upper sides.
I now tape all the pieces together; first the columns (A1, A2, for the first column, B1, B2, etc. for the second column). Then, I join the columns. This has a rhythm for me, and I have become quite quick at it.
I generally cut out the pattern after that (another anal thing, as I will be cutting it shortly in fabric)… and I am ready to go.
Time to cut the fabric!.... to be continued.
Sunday, October 26, 2008
Cooking Class? On Gnocci.. an adventure
One of my favorite Italian foods is gnocchi, which I often order instead of pasta. Gnocchi is typically made from potatoes, which are essentially mashed, mixed with flour and rolled into little balls. These are cooked, just as pasta is, in boiling water.
I decided to make dinner for my Italian friends, in thanks for all the time and patience they invest, as I attempt to learn the language. I had found a recipe for squash gnocchi in the Sunset magazine I brought along from home, for the long flight overseas. It seemed simple enough.
Initially, my plans were to make an American meal, so that the Italians could see how we occasionally eat at home. Chili con carne always comes to mind. However, I was having trouble finding powdered chili as I know it, and the same goes for kidney beans. This coupled by the fact that Santina’s expressed fear of my cooking (or was it American food… I am not sure which)… led me to believe, that exploring Italian food (albeit, with an American twist) would be my best bet. I did communicate, that my cooking gnocchi would be an experiment, and that Santini and Bruno would be likened to the royal court tasters, who would let me know if the food would pass Italian standards or not. It is a little nerve-wracking to make an Italian dish for an Italian. I know Santina understood me, as I could make out her conversation to a friend who stopped by our table. It included the words sperimento (experiment), la regina (queen), and morto (I die). The pressure was on.
My gnocchi recipe did not call for potatoes at all. Rather, it used squash. So, off I went to find squash and the rest of the ingredients. I came home with la zucca granda (a large pumpkin). It was a huge challenge to cut it up. Either their pumpkins are really, really hard, or my knife was very, very, dull. Eventually I got it into smaller pieces, and cooking.
The ingredient list for my dish included squash, flour, salt, pepper, and nutmeg. One mixed all these ingredients together, then rolled out 3/4” logs of dough, and cut these into little 1/2” pieces. Simple, just like making cookies.
The guests arrived, wine-in-hand. I had everything organized. We were to have gnocchi with butter and freshly grated Parmesan cheese, cooked spinach, salad, and bread. I had been officially requested to keep the dinner light, as lunch is often the main meal here, for those who work in the business world, (as is the case with Andrea). Andreas is Santina’s and Bruno’s son who works for a bank.
I asked Santina to help me with the cooking of the gnocchi. I have only made gnocchi once before, and it was a total flop, as I overcooked the little potato dumplings, and we ended up having potato mush. So, together, she and I placed the gnocchi in the boiling water. The general idea is to let the gnocchi cook until they rise, then wait about 30 seconds more. Then, using a slotted spoon, you fish them out and commence to dine. This we did. I had melted butter ready and the fresh cheese. We sat to eat.
Everyone pretended the gnocchi were great… but I knew better. Of course, the wine helped. I found my gnocchi to be very heavy.. the Italian word is pesante. Now, I know my guests were being gracious. But we all ate dinner, and enjoyed each other’s company. It was the first time the Italian’s had ever had zucco gnocchi, and probably the last.
If I make the dish again, I will add more seasoning, and an egg. A little latent research into other le ricette (recipes), indicated that eggs are often used. This would help a little I think with lightening up the load.
Two gnocchi attempts.. two failures. I will get it eventually.
By the way, my gnocci would be considered the Il Primi Piatto (first dish). After that, one generally has la salata, (salad), il pane (bread) and then Il Secondo Piatto (the main meat dish). If you are still hungry, you can have I Dolci (sweets) for dessert. For our dessert? We had Coffee Crisp chocolate bars… a Canadian touch, thanks to my niece Tara who sent over a pack of my favorite chocolate bars. Thanks Tara.
Oh yes… there was no Morto! (I die!) The court testers made it through the evening.
On Studying Italian... and Prego
I’m trying to fit in…. which means, while here in Italy, I am trying my best to speak Italian. All would have been better, had I not decided to take a two-week Spanish class this summer, as I seem to sprinkle my Italian phrases with a touch of Spanish. I can usually tell when I have done this, as the person I am talking to cocks his or her head in a certain way. I stop, think, and realize that I have just messed up… again. Of course, there is a bit of French slipping in, every now and then. That goes back to my high school years, and even after two semesters of studying Italian, I still have a stronger command of French… il mio dio! What is the Italian word for the Spanish Gringo?
Given all my ineptness at times, I am delighted to say that I have been able to communicate enough to conduct my sabbatical research in libraries where the workers speak no English, and no French, and no Spanish. So, somehow, I get my point across. This is what life is all about for me. I am so thoroughly excited about living in a different culture, shopping in the vegetable market for my daily foods, stopping for an espresso or cappuccino in the middle of the day, and simply watching the people walk by. I have attended two lectures now, where the only language spoken is Italian. The first was on the Photography of the Bauhaus, and the second was a guided tour and lecture on Contemporary Digital Photography. I am working my way up to a play, and let’s hope I find one before it is time to go home.
About every other day, I meet my adopted Italian family, for coffee in the morning. At 9:30, I show up at Cafe Noris to find Santina and Bruno Campolongo sitting at their usual table, reading the paper. They speak no English, niente (none). So, after several meetings, I have dubbed Santina as La Mia Professoressa del Inglese, alla Tavola… which means “my professor of English at the table” (meaning our breakfast table). Il Noris is a wonderful cafe, where Santina and Bruno go regularly, read the paper, drink an espresso and commence their day. Santina and I have talked about many things; her work day, my work day, her children, my children,, and so on. I sit there with my English-Italian dictionary looking up words when I can’t quite get my point across. Bruno talks to me also; we have discussed politics, and I know where he stands with the upcoming American election. He keeps me abreast of the point spread between Obama and McCain. Recently, Bruno told me that on the weekends he is a fannullone. I had to look that one up. Once I read the definition, I broke into laughter, and this word is now a joke between us. Bruno told me that he chooses to be a lazy-good-for-nothing. I applaud this, as Bruno is in his seventies. Every weekday afternoon he works at his son, Andrea’s, newly purchased apartment, renovating it so that it can be rented to tourists like myself. We call the space Susanna’s appartamento…. Meaning that it will hopefully be my home on a regular basis, as I hope to visit Verona often (as long as my miles last). After all, I met my Italian family because they were my landlords on my last two visits.
Let’s take a look at my current challenges…. How does one understand Italiano? Well, it can be incredibly confusing, but it is still, simply a blast. To begin, let’s take a look at one of the anomalies of the language.. the use of the word, Prego.
Un Lezione della parole, Prego..
Prego, as a word, has intrigued me, as it has so many meaning. It is used in the following ways;
Prego… says the waiter, as he stands there with his order pad in hand, awaiting you to give your order. He has already been back two or three times for the order, but you are struggling to sort out what the food options are, as the menu is only in Italian. I think you can guess at the tone of voice with this prego.
Prego.. says the sales clerk, in response to your Grazie, (meaning thank you) after assistance was given. She is saying you are welcome. In my case, she is probably saying, thank goodness, she has finally made up her mind.
Prego…. says the man who is letting you enter through the door he has decided to hold open for you. Chivalry is not dead.
Prego? … say I, when I didn’t quite get what the person was saying to me? This would basically mean, I’m sorry, what did you say?
Prego… says the train conductor, as you stand there, looking baffled, about whether this is the car you are supposed to get on, or not. He is asking to see your ticket, or maybe he is wanting you to get on the train quickly, as you are holding up the show. No matter what his intent, you know he wants to get you moving. Of course, his tone of voice delivers the intent of his question, and communicates how soon the train will depart.
Prego? …. Says a person, when they are told the cup of cappuccino costs four euro, instead of the typical two euro. This would basically translate to “You can’t be serious”. I could have used this one today when I purchased two meringue treats, and after they were bagged the cashier asked for five euro ($7.50)…. Prego??
And …Prego.. this is what you do, when you go to church and pray, as the literal translation of the verb Pregare, is “to pray”.
Favorite Italian Words…
I have become fond of many Italian words, and wish I could used them daily back home, but most people wouldn’t know what I was saying… but here is my list, and the translation.
As you go through the list, you must try to say the words, as you work your hands (in gestures) and add a rhythm to the pronunciation… so you almost sing the word. Typically, as a general rule, the second to last syllable is the emphasized syllable, although…. yes, there are always exceptions to the rule. Of course, you simply have to memorize most of these. Mama mia!
My List
Allora – (ah LOR ah). – I love, love, love this word. It technically means “then”, but it is yet another word, that is used in many ways. It is used as a transition between thoughts, as a pausing word, and as the beginning of a new statement. You hear it often.
Andiamo (awn dee AH mo) – This means “we go”… so when you getting read to leave with friends, you say ‘andiamo’, or let’s go.
Ciao – (chow) – which means hello, good-bye, and probably other things as well. As I listen to people talk on their cell, I can usually tell when someone is trying to get off the phone, as you hear a series of ciao, ciao, ciao’s. This is like our bye… bye-bye. Of course there are variations of the word, such as ciao bella (which means, I think, hello/goodbye pretty one).
Va Bene – (vah BEN eh) which means, “it goes well”. I hear it both as a question and an answer. When you meet someone, you can say, “Va bene? They can answer, Si, va bene… or Non va bene.
Pronto – (PRON to) This generally translates to “ready, speedy, or prompt” (ah… another word akin to prego). However, when you answer the phone in Italian, you say “Pronto!”. I have a borrowed cell phone, and it just makes me roll over with amusement to answer the phone, not that this happens a lot, as I don’t really know anyone who would call me. Yet, when I get the occasional call, I say “Pronto!” … and then I break out into a fit of giggles. I have no idea what the person on the other end of the line thinks. I haven’t got past that yet. I guess I need more people to talk to.
There is so much more for me to learn about the Italian language. I continue my efforts by buying books, magazines, and popular music in Italian. I have translated recipes, knitting patterns, poetry and various other things. I even have an Italian pen pal in Cortona (a city in Tuscany). I have no idea how correct my translations or writings are, but I am growing in my abilities. This project will be a long-term one for me, but it is a fun one, and I am able to stretch my mind.
So, in ending, I shall say…
Ciao! (or if you phone me, Pronto!)
Allora…. Va bene? Ah,… si, va bene con mio.
Prego? (what did you say?)…. Ah, si, andiamo…. Pronto!
Ciao bella.
P.S.
oh yes... since I wrote this piece, I DID go to the theatre. I saw a Shakespeare play, Love's Labor Lost.... in italian of course. I understood parts of it.. just a step beneath what I understand when it is old english. But, va bene.. it was good.
Thursday, October 23, 2008
Project (cont'd) Onto Garment Designer
It should be no surprise that I use Garment Designer software for everything, given that I am the software designer and owner of Cochenille, the company that develops the program. Over the years, no matter how many times I use the software, I still get a charge, each time I sit down and create something. I often chuckle to myself, as I find that I can create the pattern and have it printing out, long before I would find the keys to the car to go to the fabric store.
Before I start making the pattern, I generally make myself go through the following list of questions..
1. What basic pattern pieces will I need?
2. Do I need any additions (e.g., facings, extensions, etc.)
3. Do I need any extra pieces (e.g., bands, pockets, etc.)
I chose to build the basic pattern for this project, while at the Novi Show. That way, I would know exactly how much fabric to purchase. So… in Garment Designer, I began by choosing my personal Sloper. This way, the program knows my personal body, and I can avoid the typical pattern alterations I would have to perform to a standard size. I no longer need to shorten the waist, narrow the shoulders, and adjust the sleeve length. What joy!
Next, I chose the following style options:
Top Group: Contoured
Top Style: Bolero Curve
Shoulder: Sloped
Neck Group: V
Neck Style: Medium Curved
Darts: None
Sleeve Group: Cap
Cap Style: Straight
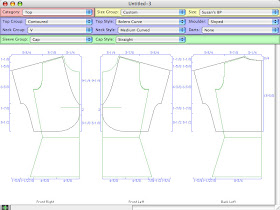
Next, I used the ability to edit points and lines to move the armhole of the sleeve down some, and to move the neckline back just a bit. I turned on the view of both sides of the front, turned Front/Back symmetry off, and then edited the center front of the garment so that the fronts would overlap slightly, to allow for my button.
I then, used an Extra, called Edging, and chose the edging for the hem of the garment. This allowed Garment Designer to measure around the hem of the garment and create a straight band edging. I wanted it to be gathered slightly, so I chose to change the Hem Edging Attach: to 1.5:1. This is probably more than I want (in fullness), but for the moment, I shall plan for it, and look at it pinned on the garment prior to sewing. I often work this way.
Once all was in order, I saved the file. Then, I added seam allowances, and turned on the Final Pattern view, which would be me notches for matching.
Fabric Needs?
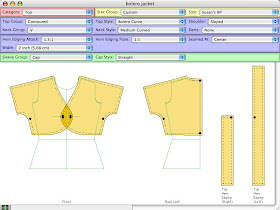
To determine how much fabric I would need, I requested the Pattern Layout option in the Generate menu. A new window opened, and in this window I could drag my pieces around, flip them, rotate them, etc., to determine how much fabric I would need. This is just like doing a layout on your real fabric. I LOVE this feature. It has always been a game to me, to see how good of a layout I can get.
At this point, I went over to Haberman’s booth and bought the fabric. I needed 5/8 yards. I generally buy just a little extra, for testing, etc. So I purchased 3/4 yard.
More to be continued… as the project commences.
Next will be the challenge (and fun) of finding the yarn.
Design Project: Mixed Media Top
People often ask me how I approach designing a garment. Do I start with the silhouette, the fabric or yarn, or a general concept of texture, mood, or other.
I would have to answer that for me, there is no one way. I do not have a formula. The approach more often is controlled by a trigger, i.e., what it was that excited me. Sometimes it is the fabric, another time, it is a garment I’ve just observed. It is different each time, and that is part of the joy for me.
Since I have just embarked on a project (that is in its beginning phase), I shall take you along with me, as it runs its course. Of course, this may take its gentle time, as some of my projects do. I tend to work on more than one thing at a time. I would not say that this is a good thing, but it suits my personality.
Where did it start?
This time, the project was inspired by a piece of fabric that I saw in the Haberman’s booth at the Sewing Expo Show in Novi, Michigan in September. Haberman’s has the most wonderful fabric, and I always vow I will not buy another piece at that show. But I generally weaken and waltz home with a piece of something irreplaceable, fantastic, and completely necessary in my life! (if only that were the truth).
So, at this show, the fabric that spoke to me was a fur-like fabric, somewhat akin to a polar fleece, but more, like fur. (see the illustration). I just fell in love with it. It came in three colors, and it was a challenge to settle on which color I would choose. As soon as I saw the fabric, I knew I wanted to sew with it, but combine it with hand knit pieces as well. I had petted the fabric a few times, coming and going from Haberman’s booth. Then, on one particular exit, I saw a very intriguing garment hanging up on display. It was made of the same fabric in the black and white version. I liked the garment a lot, so when this happens, I generally stop myself and ask, “What are the distinguishing features of this piece that you like”? Then I mentally make notes about what specifically it is that has caught my attention.
In this case, I would say the following of the garment. It…. was a short cropped bolero-style garment
had a wide collar with full sleeve cuffs
had an extended cap sleeve which expanded further into deep cuffs.
had a ruffle effect running around the lower edge of the garment
I did not need more than this. No measurements, no trying it on, ….nothing. I just needed to remember the key features that caught my fancy.
In designing, it is rarely my goal to copy a garment precisely. Where is the fun in that? Rather, I would prefer to use key features of the garment as a starting point, and then do my own thing, within the loose structure I have given myself.
The Sketch
Sometimes, the next step for me is to sketch my concept. It is generally pretty rough, as I am not a great artist when it comes to drawing by hand. But, through persistence, I have learned some basics of proportions, and I can get a general drawing down, enough for me to understand what I meant, and that is all I need. I generally start by drawing a head and the sense of a neck. I often put a center line, that extends through the head and down into the body. Then, I draw half the garment. Once I am happy with the half, (and presuming the garment is not symmetrical), I draw the other side. Sometimes I “eye” the proportions between the two sides, attempting symmetry. If I am having a bad drawing day, then I either use my pencil (or a ruler) to measure key spots on one side, and use this held point to help me on the other side. When it is really a bad day for drawing, I simply fold the paper in half on my center line, and go to a window, hold the paper up to the light on the glass, and trace the second side.
Here you can see my hand sketch. It’s not bad… it communicates to me my thoughts. Trust me, they are not all this readable; sometimes they are pretty bad, especially if I am in a car, on a train, or walking.
Note: I often bypass the sketching step and go straight to the computer. This time however, the sketch became a way for me to communicate to a friend what I was thinking.
Monday, October 20, 2008
Picasso Quote for the Day
I’m reading the paper; I’m chatting; going for walks.
But all of this is just perception. I’m actually working.
Or rather; something is spinning around in my head and I’m
Just waiting to grab it and form it."
Pablo Picasso
I saw this quote, written on the wall at the Swarovski Museum, in
Wattens, Austria
When I read this quote, I sat back and thought about it.
What Picasso has said is so in sync with my thoughts on design.
On Designing…
I believe that the ability to design is a learned skill. Yes, some people have a natural talent, but we are all capable of developing skills that will help us to be better designers. The key ingredient is the desire. Once you are willing to admit that you want to design, and you are willing to invest some time in develop skills, you have crossed the barrier. The rest should be relatively simple, should you choose to then follow through and remain open to learning.
It is my belief that designers have simply learned a special skill. They have learned how to ‘see’. And there is a point at which one knows that they have reached the pinnacle… the designer’s mindset. This turning point, is the moment, at which you cannot turn your eyes and mind”off”. Everywhere you go, you see things that you can use in design. You look at a leaf, and think about its color. You see a pattern in the stone path, and yes, you could knit that. You watch the sunset, and think that the gradient colors it is sharing, are ones you could use in your next fiber project.
Picasso was telling us, that his mind was always working, even when he appeared to be relaxing, reading the paper, or simply taking a walk. He saw inspiration in everything, and it was just a question of forming it into a painting, a sculpture, or whatever medium he chose to work with.
We can do the same.
Susan
Saturday, October 18, 2008
Ciao Bella, Verona
I have been in Verona, Italy for the past ten days. I have fallen in love with this city, and this is now my third stay here. Each visit gets progressively longer. I now am able to speak some Italian, and have been managing my sabbatical research, doing just that…. speaking Italian.
The Adige river winds its way through Verona, and there are about ten bridges that cross the fiume (river). Each bridge is a little different in style. Around 250,000 people live in Verona, and it is a city that offers everything, but yet, is manageable on foot.
I initially came to Verona, to see the world-famous opera, which takes place in a historic arena, the second largest Roman arena, next to the Coliseum in Rome. Imagine sitting on stone steps, listening to Puccini, in that kind of ambience. They use not acoustics for the singers, and you can hear them just fine.
There are many museums, and of course, many beautiful cathedrals and churches in the city. Of course, Verona is famous for the story of Romeo and Juliet, and it is considered the city of Love.
I never run out of things to do. I manage my work day by balancing culture and work. If I work during the day, I can go to a concert at night. If I explore during the day, I work at night.
The pictures here will give you a sense of what one can see in Verona.
A view of the Roman theatre, yet another historic site in Verona.
Juliet’s balcony, and the view from her home.
A busker in the streets… can you guess who he is portraying?
The Lamberti Tower at night. It is 362 steps, and sister Chris and I walked them all.
A night view from Lamberti tower. You are looking at Piazza Erbe.
A wonderful food shop, that sells amazing Italian condiments, sausages, cheeses, wine, and pretty much anything that could feel you well.
More to come, as my stay continues.
Tuesday, October 14, 2008
A New Knitting Shop in Watten, Austria
Meet Andrea. She is the owner of Andrea’s Wollstuberl, a new knitting shop that has opened in Watten, Tirol, Austria.
Ursula and I stumbled upon Andrea’s shop by accidenet, but I was delighted, as I had been hoping to find a yarn store, as I have been in the process of designing and planning a project, which combines sewn fabric and yarn (more on this in an upcoming blog).
Andrea’s shop has only been open for a few weeks, but she has a wonderful supply of yarn, and she was such a gracious host. I brought my fabric in, and we matched yarn, and
Technique: Pleating Technique used in Tirol Tracht (Folk Costume of Tirol, Austria)
Thanks to Sabine Lintner and Christine Miller of Trachtenwerkstatt for showing me this.
This pleating technique utilizes a special fabric called “gabeln”, which is a fabric printed with a grid. The marking lines were approximately 1/2 cm. wide by 1 cm. tall. Note: that gingham could be substituted, but gingham is generally square.
Step-by-Step
1. Stitch or overlock your fabric onto the base fabric.
2. Using a needle and thread, baste a line of stitches on the wrong side of the fabric, using the gridded gabeln as your guide. Leave a long tail.
3. Repeat this for as many lines of basting as you deem necessary for your task.
4. To create the gathers, on one end of fabric, grab the tails of allyour threads, and jointly pull them. Do not cut the tails. You can leave these for later, as an adjusting device. (Note: that in Tirol costume, these tails are neatly knotted and tucked inside, so that they can be used to alter a garment later, to make it smaller or larger, as the need arises).
5. Smooth out the pleats that form, so that they are parallel.
6. Stitch to a band or other stabilizing structure.
If you like, you can embroider on the right side of the garment (as in smocking techniques) to embellish the surface and hold the pleats in place.
Technique: Rosenrueschen Trim (Ruched Rose)
Thanks to Sabine Lintner of Trachtenwerkstatt for showing me this, and for doing the step-by-step instructions for us.
This is a trim, made by constructing and sewing a tube of fabric, and then, pleating it. After the trim is constructed it can be attached to a surface of a garment to embellish it.
1. Cut a length of fabric, twice your desired width plus 2 x your seam allowance.
2. With right sides together, sew the tube lengthwise.
3. Turn and press.
4. Using chalk, mark every 1” on the strip (or other length, depending on how deep you want the pleats.
5. Using an iron, press in the pleats, These are box pleats. See the picture for detail.
6. Carefully lay the folded band onto the sewing machine, and stitch a line down the center and over the folded pleats. This line will secure the pleats in place.
7. Using the illustration as a guide, folder two edges together, and with a needle and use a whip thread stitch to permanently attach them. Continue this along the length of trim.
8. Attach the grim to your garment.
Note: If you like, you can attach the trim to your garment as you stitch the line that holds the pleats together (Step 6).
Other Interesting Austrian Garments
Here are two more interesting Tirolean pieces that I saw at the Trachtenwerstatt.
In the images below, you can also see a woman’s hat from a different region of Austria. Note the long velvet bands that hang down the Sabine’s back, from the hat to her knees. The hat is made of black velvet cotton (we call it velveteen in the U.S. and Canada). The underside of the brim is fully embroidered with gold covered thread (which is traditional in the past, but now a metallic thread is used).
In the second image, you can see a vest that was hand knit by Christine and is modeled by Ursula. Christine used primarily garter stitch to create the body of the vest. Yet, with the simple stitch, she has added a lot of wonderful details which include the trimming, the embellishment at the front, and the absolutely great cable-stitch inset at center back, which is actually a wedge that is pleated (like a box pleat) into the opening. A clasp holds the pleat somewhat closed in the lower end of it. Isn’t it great!
Trachtenwerkstatt, Wattens, Tirol, Austria
Meet and Sabine Lintner and Christine Miller. These two young women recently opened the Trachtenwerkstatt in Wattens, Austria, which translate to Traditional Costume workshop. Sabine trained in a fashion program and then worked for a clothing manufacturer. Christine worked with a tailor and learned her skills there. Together the two have founded a business and only recently moved it to a storefront operation in Wattens, a small town in Tirol, a district of Austria near the German border.
The Trachtenwerkstatt specializes in the design and construction of authentic traditional Austrian costume, from the region of Tirol. In addition to creating new garments, using traditional styles and techniques, they also repair and rework ensembles that need repair.
Sabine and Christine were amazingly gracious and willing to share. They showed me many of their techniques and had prepared samples for me to bring back to my students in San Diego. In addition, Sabine demonstrated, step-by-step a trim technique knows as Rosenrueschen (which means ruched rose). See the technique in another blog entry.
Christine, the tailor, showed me an example of the traditional leiderhosen, and I got to examine its construction, particularly the trim, and how one gets into the garment and fastens it. She even put it on for me, as you can see from the pictures. This leiderhosen and shirt belong to Christine’s husband, ad she tailored it for him.
A traditional woman’s ensemble from Tirol would consist of the following: (sorry, I don’t know the correct German name)
Blouse- This was made of linen, and cut rather short (waist-length). Necklines varied a little, as did the sleeve. Some sleeves were fuller, and some had smocking/pleating at the top of the cap.
Dress – The woman’s dress consisted of a bodice attached to a skirt.
The sleeveless bodice itself did not meet at center front. Rather, it has beautiful metal lacing clasps, stitched to each side the front. The style of the metal clasp was specific for the region, as was the number (seven pairs) used on the bodice. An insert of fabric, a latz, is finished and embroidered, would be placed in the center front opening, prior to lacing, and then the bodice would be laced to fit the wearer and the insert would be held in place. The lace in this area is red, which is also significant. The back of the bodice had structural seams (we would call them a princess seam), that were defined and covered with a velvet ribbon. This also was very specific and traditional to the region.
The skirt was made of two rectangles. A pleating tape (called gabelin) is used on the inside top of the skirt to help the seamstress know where to baste, to create the wonderful parallel gathers. (see the Technique in a separate blog). The fine pleating was not done all the way around the waist. The center front of the garment used several larger pleats.. To facilitate getting in and out of the garment, Sabine has utilized a zipper, which is not traditional, but functional for today’s use. A slit and pocket is inserted into the font of the skirt, and this will not be seen under the apron, which is the next garment. At the hem, they must have 1-2 mm. of red wool fabric peek from the underside (as this is distinctive to this region). In other regions the amount is different, or the red band may also
Apron – The apron is very much a part of the costume. A long rectangular piece of fabric is pleated onto a waistband. The wearer ties the apron over her skirt. She will communicate her marital status by where she ties the bow of the apron. Where the bow of the apron’s tie band.
Bow on the Left – she is an unmarried girl
Bow on the Right – she is married
Bow at Center – she is a widow
The information I gained at the Trachtenwerstatt was excellent. I was so impressed with the workshop and work of Christine and Sabine; they are keeping tradition alive and doing it with an energy and joy that is evident.
Visit them at www.trachtenwerkstatt.com
Images of Austria
As you approach Austria from Munich (Munchen), you will begin to see the Alps stretch out in front of you. The images here show you a few views of Austria.
A restaurant in a small town called Ebbe, in the area of Tirol, near the Austrian/German border.
The window and fall leaves that surround it.
An Austrian sunset.
The Alps, in the evening, as viewed from the train.
A restaurant in a small town called Ebbe, in the area of Tirol, near the Austrian/German border.
The window and fall leaves that surround it.
An Austrian sunset.
The Alps, in the evening, as viewed from the train.